Izenda Fusion Driver

This documentation is for the legacy Izenda 6 product. Documentation for the new Izenda 7 product can be found at https://www.izenda.com/docs/
How the Izenda Fusion Driver works
The Izenda Fusion Driver composes data sources from several connections (data providers) into a single data source. This is very similar to how SSAS works, but using Fusion you can aggregate data not only from MSSQL databases but from very different data sources. For example, you can get data from the OData data provider (i.e. without a direct connection to the database). All you need to do is set up the data sources' connections and you will be able to work with aggregated data as a single data source.
 Figure 1: Schematics of how the Fusion Driver interacts with different datasources
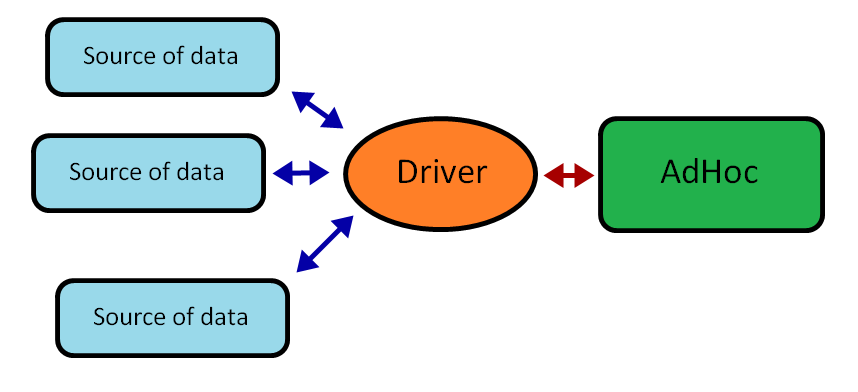 Figure 2: The driver works directly with your datasources and provides Izenda AdHoc with complete information about tables, fields of tables, data types, etc.
Configuring the Izenda Fusion Driver
Configuring the Izenda Fusion Driver is almost the same as configuring the Izenda Driver with single connection. The main differences are:
- Allows you to set up more then one data source end point
- Allows you to set up database constraints separately for each connection
- Needs to use additional connection strings for the AdHoc table if your reports are stored in your database
Configuring the Izenda Fusion Driver consists of several steps:
1. Create the Fusion Driver
At first you should create FusionDriver object and set up it as default driver for the Izenda AdHoc. Here is example how to do it in C#:
FusionDriver fusionDriver = new FusionDriver();
AdHocContext.Driver = fusionDriver;
2. Add connections to the driver
Now you can add connections to the data sources end points. The end point could be a direct connection to the MSSQL database or it can be an OData connection to the MSSQL or Oracle database.
a) Adding a connection to the local MSSQL database.
You should specify the connection nickname in first parameter, the connection type of MSSQL in the second parameter, and the connection string in the last parameter:
fusionDriver.AddConnection("SqlNW", FusionConnectionType.MsSql, "server=(local);database=Northwind;Trusted_Connection=True;");
b) Adding a connection to the OData provider.
You should specify the connection nickname in first parameter, the connection type of OData in the second parameter, and the link to the OData end point in the last parameter:
fusionDriver.AddConnection("OrclNW", FusionConnectionType.OData, "http://www.providerdomain.com/provider_endpoint.aspx");
3. Set up additional settings
The Izenda Fusion Driver has several additional settings:
a) VisibleDataSources
This is setup the same way as for a single connection. Only data sources with the specified names will be available:
fusionDriver.VisibleDataSources = new string[] { "Orders", "Customers", "Order Details" };
b) Constraints
This is setup the same as for single connection except that you are able to specify separate constraints for each connection by using connection nicknames. Note that you can use wildcard characters to set up constraints:
fusionDriver.AddConstraint("SqlNW/Order.Id", "SqlNW/*.OrderID");
fusionDriver.RemoveConstraint("OrclNW/Account.Id", "OrclNW/User.AccountID");
c) ReportingConnectionString
If reports are stored in the database you should specify connection string to that database. Note that in addition to this, you should also use FusionAdHocConfig instead of DatabaseAdHocConfig. The following example sets up the connection string to the database using the reports table. If you store reports in the file system then skip this step(use FileSystemAdHocConfig if you do this).
((FusionAdHocConfig)AdHocSettings.AdHocConfig).ReportingConnectionString = "server=(local);database=Reports;Trusted_Connection=True;";
d) Set up cache
Getting data from several data source providers may take a lot of time and resources when many connections are added. This will result in a slow connection to the providers due to large amount of data being transferred, etc. That’s why the cache is enabled by default for the Izenda Fusion Driver. By default, cache expiration time is set to 12PM on Saturday. This means that every Saturday, the cache will be cleared and all data will be requested from the providers during the next session.
You can configure the cache yourself by using the following properties and methods:
- DataCacheExpiration: Sets the date for cache expiration. All data in the cache older than the specified date will be cleared (removed from the cache). For example, if you want to clear all data more than two days old, you should set:
fusionDriver.DataCacheExpiration = DateTime.Now.AddDays(-2); - CacheAllReports method: Adds all available reports to the cache:
fusionDriver.CacheAllReports(); - CacheReport method: Adds a single report with the specified name to the cache:
fusionDriver.CacheReport(string reportFullName);
Sample use
Below is a full example of how to set up and configure the Izenda Fusion Driver with several connections and reports stored in your database:
<%@ Application Language="C#" %>
<%@ Import Namespace="System.Data"%>
<%@ Import Namespace="Izenda.AdHoc.Database"%>
<%@ Import Namespace="Izenda.AdHoc" %>
<%@ Import Namespace="System.Configuration" %>

<script runat="server">
    void Session_Start(object sender, EventArgs e)
    {
        // Set license key. Note: "+FUSION" must be in license key
        AdHocSettings.LicenseKey = "LICENSE KEY";

        // Set config. Note: config class must derive from FusionAdHocConfig or FileSystemAdHocConfig
        AdHocSettings.AdHocConfig = new CustomFusionAdHocConfig();

        // Create Fusion driver and set it as default driver for AdHoc
        FusionDriver fusionDriver = new FusionDriver();
        AdHocContext.Driver = fusionDriver;

        // Add connection to the local MSSQL database
        fusionDriver.AddConnection("SqlNW", FusionConnectionType.MsSql, "server=(local);database=Northwind;Trusted_Connection=True;");
        // Add connection to the OData provider which is connected to the Oracle database
        fusionDriver.AddConnection("OrclNW", FusionConnectionType.OData, "http://www.providerdomain.com/Oracle/FusionEndpoint.aspx");

        // Add visible data sources
        fusionDriver.VisibleDataSources = new string[] { "Orders", "Customers", "Order Details" };

        // Configure constraints for connections
        fusionDriver.AddConstraint("SqlNW/Order.Id", "SqlNW/*.OrderID");
        fusionDriver.RemoveConstraint("OrclNW/Account.Id", "OrclNW/User.AccountID");

        // Clear cache
        fusionDriver.DataCacheExpiration = DateTime.Now;

        // Add some reports to the cache
        fusionDriver.CacheReport("Financial reports\Sales");
        fusionDriver.CacheReport("Common reports\Employees");

        // Set connection to the database with reports table
        ((FusionAdHocConfig)AdHocSettings.AdHocConfig).ReportingConnectionString = "server=(local);database=ReportsDB;Trusted_Connection=True;";
    }

    [Serializable]
    public class CustomFusionAdHocConfig : FusionAdHocConfig
    {
        public override void ConfigureSettings()
        {

        }
    }
</script>
Customizing the Izenda Fusion driver
Izenda reports is designed as a modular system to be easily customizable for usage with any datasources. The AdHocContext class has a Driver property containing an instance of Izenda.AdHoc.Database.Driver abstract class, which provides datasource metadata for Izenda AdHoc.
The Izenda.AdHoc.Database.MSSQLDriver class implements complete functionality for using MSSQL server as your datasource and also allows you to create inheritors. So the easiest way to create a custom driver working with MSSQL server is to inherit Izenda.AdHoc.Database.MSSQLDriver and override the functionality you need to work differently. Below is complete instruction on performing this.
1. Create new project with type of Class library in Visual Studio (Figure 2).
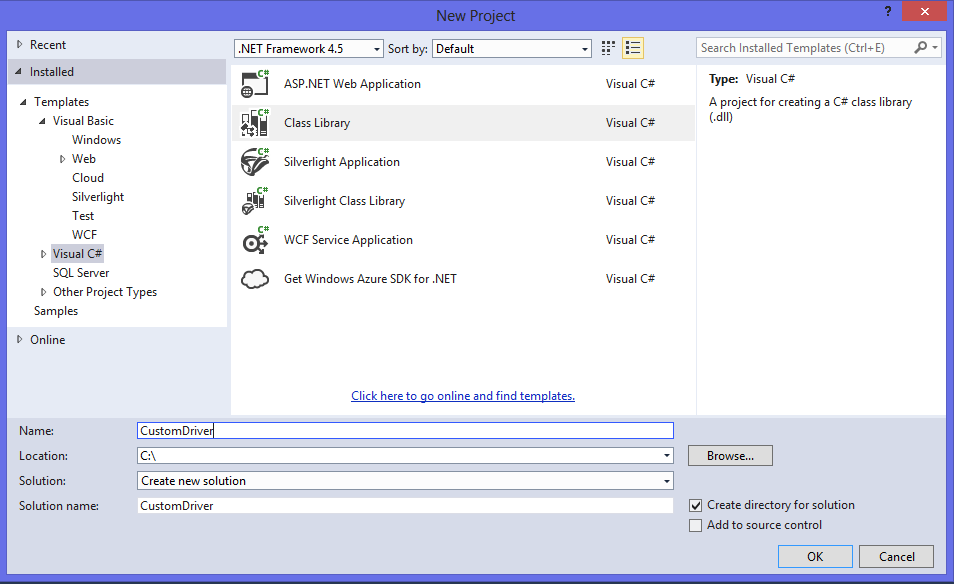 2.
2.